Urban Exploration & Urbex Safety Academy
Explore the forgotten corners of the city without becoming a statistic.
About This Quest
Master abandoned building exploration with real-world safety protocols, structural assessment techniques, and legal navigation strategies from experienced urbex practitioners.
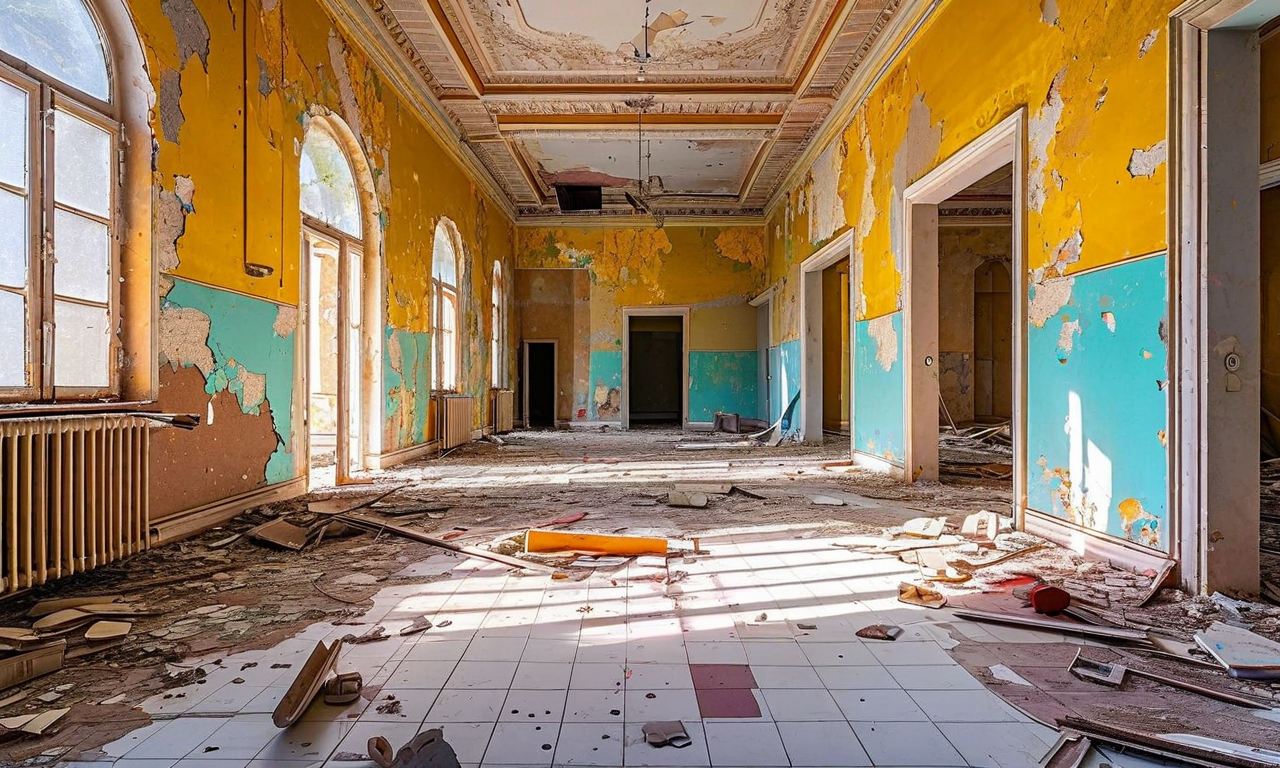
Urban exploration isn't about breaking into places for Instagram likes. It's about understanding structural integrity, recognizing environmental hazards, and making split-second decisions that keep you safe. This academy-style quest teaches you the fundamentals that separate weekend adventurers from experienced urbex practitioners who've been doing this for years without incident. You'll learn to read buildings the way climbers read rock faces. That sagging ceiling isn't just aesthetic decay—it's telling you about water damage, compromised joists, and where not to walk. The smell of ammonia means more than just old pipes. These details matter when you're three floors up in a structure that's been abandoned for fifteen years. We'll cover everything from asbestos identification to dealing with security, from choosing proper footwear to understanding trespassing laws in your jurisdiction. This isn't a guided tour of pretty ruins. You'll practice risk assessment on actual structures, learn to identify load-bearing walls versus partition walls, understand how to navigate in low-light conditions without attracting attention, and develop the judgment to know when a location is too dangerous to enter. The best urbex photographers and documentarians stay safe because they know when to walk away.
Step-by-Step Guide
Start with classroom basics at home: Study your local trespassing laws, understand the difference between criminal trespass and civil trespass, and research abandoned property databases for your area. Know before you go—legal consequences vary wildly by jurisdiction and property type.
Scout your practice location during daylight first, never alone. Drive by at different times to observe security patterns, note active businesses nearby, and identify multiple exit routes. Look for posted signs, security cameras, and recent activity. The best urbex happens at locations you've researched for weeks, not stumbled upon randomly.
Conduct a perimeter assessment before entry. Check for structural red flags: major cracks in foundation walls, bowing exterior walls, collapsed sections, fresh demolition notices, or active utilities (means it's not truly abandoned). If the building looks like it could collapse in a strong wind, it probably could.
Practice the three-point contact rule on your first interior walk-through. Move deliberately, test floor stability before committing your weight, and avoid areas where you can see through to lower floors. Stick to exterior walls where structural support is strongest. The middle of large rooms with suspended ceilings is where floors fail first.
Learn to identify common hazards in your practice run: asbestos insulation (white/gray fibrous material on pipes), black mold (dark patches with musty smell), compromised stairs (test each step from the side), broken glass patterns (indicates recent human activity), and animal nests (raccoons and possums are more aggressive than you think).
Document your route mentally and physically. Drop waypoint pins on your phone, take photos of your path, and maintain awareness of your exit routes at all times. In low-light conditions with adrenaline pumping, buildings become mazes. I've seen experienced explorers get disoriented in structures they thought they knew.
Practice low-light navigation without using your main flashlight constantly. Let your eyes adjust, use red light to preserve night vision, and move during overcast days when ambient light is diffused. Flashlight beams visible from outside attract unwanted attention from security and other explorers with less noble intentions.
Develop your photography workflow for urbex: shoot in RAW for maximum editing flexibility in low light, use wide apertures (f/1.8-f/2.8) to capture ambient light, bring a small tripod for long exposures, and never use flash near windows. The best urbex shots happen during blue hour when there's just enough natural light to balance interior and exterior exposure.
Create an emergency protocol and share it with someone outside. Set check-in times, share your location, and establish a code word system. If you miss a check-in, your contact should know whether to wait thirty minutes or call emergency services immediately. This isn't paranoia—it's standard practice.
After your session, conduct a gear and health check. Inspect your clothing for contaminants, check your skin for cuts or scrapes you didn't notice, and properly clean any equipment that contacted potentially hazardous materials. Tetanus shots should be current. Some infections don't show symptoms for days.
Gear Up for Your Quest
Get everything you need to make this quest amazing.
Steel-Toe Urban Exploration Boots
EssentialHigh-ankle boots with steel toe protection, puncture-resistant soles, and aggressive tread patterns designed for industrial environments
Get This ItemN95 or P100 Respirator Mask
EssentialNIOSH-approved respirator with replaceable filters rated for particulates, mold spores, and asbestos fibers
Get This ItemTactical LED Headlamp with Red Light Mode
EssentialHands-free LED headlamp with adjustable brightness, red light mode for stealth, and minimum 200-lumen output
Get This ItemCut-Resistant Urban Exploration Gloves
EssentialKevlar-reinforced gloves with palm grip, touchscreen-compatible fingertips, and protection against cuts, punctures, and abrasions
Get This ItemPortable Air Quality Monitor
RecommendedDigital monitor measuring CO, CO2, VOCs, particulate matter, and oxygen levels in real-time
Get This Item💙 Shopping through these links helps support IRL Sidequests at no extra cost to you. Thanks for making adventures possible!
Editor's Picks
Hand-selected quests our team thinks you'll love

Tabletop Firepit Night
Cozy, gooey, unforgettable nights.

Cocktail Science Lab
Turn your kitchen into a mad scientist’s bar.
Pellet Gun Accuracy Challenge
Sharpshooter bragging rights start here.